


In typical PHP applications, managing file uploading is always a big challenge.
To overcome that, laravel have its own strong storage library system known as FileSystem.
File system configuration file is located at config/filesystems.php
In this configuration file you can see 3 discs by defaults with their upload path:
- local
- public
- s3
You can add custom discs as much as you need, if you want to add.
Let's see how can we upload an image using filesystem in Laravel.
First of all let's create a controller and define a route for displaying a form to upload an image.
To create a controller we will run following command to create controller:
php artisan make:controller FileUploadController
Now, let's create a function to show the view form. in our case file_upload.blade.php
FileUploadController.php
public function showFormPage(Request $request)
{
    return view('file_upload');
}
web.php
Route::get('show-form-page', [App\Http\Controllers\FileUploadController::class, 'showFormPage'])->name('showFormPage');
Now, We have to create a blade file in views to add a form for image upload.
file_upload.blade.php
<div class="container">
    @if(session()->has('success'))
    <div class="alert alert-success mt-4" role="alert">
        {{ session()->get('success') }}
    </div>
    @endif
    <form method="POST" action="{{ route('uploadAnImage') }}" enctype="multipart/form-data">
        @csrf
        <div class="form-group">
            <h2>Image Upload</h2>
            <div class="form-group">
                <input type="file" name="image" class="form-control-file" id="image_upload">
            </div>
            <div class="form-group">
                <button class="btn btn-success" type="submit">UPLOAD</button>
            </div>
        </div>
    </form>
</div>
We now add a function having a logic to upload a image using filesystem. Therefore let's create a method containing image upload logic.
Add the following route in your web.php
Route::post('upload-an-image', [App\Http\Controllers\FileUploadController::class, 'uploadAnImage'])->name('uploadAnImage');
Put following code in your FileUploadController.php
public function uploadAnImage(Request $request)
{
    $request->file('image')->store('avatars', 'public');

    return redirect()->back()->with('success', 'Image has been uploaded successfully.');
}
Let's understand what is happening behind the scene.

Now, at this point, we have successfully uploaded successfully.
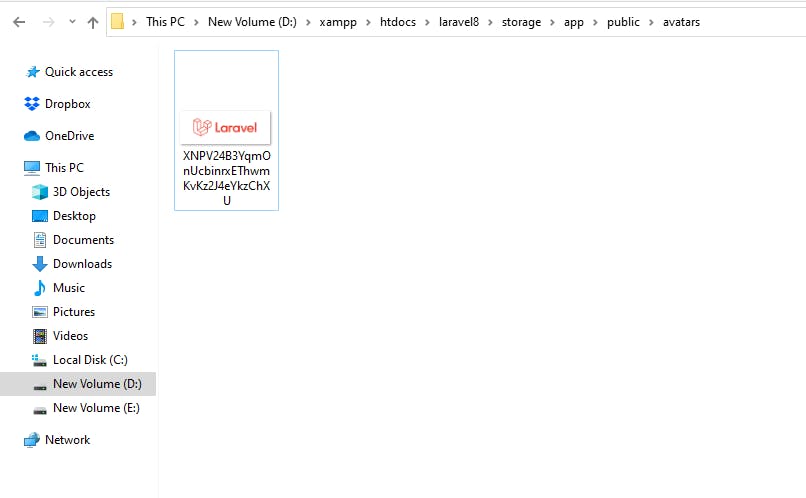
As you can see in above, image name is uniquely generated by filesystem itself which is hash of the actual file name. Therefore we don't have to worry about allotting a name to an image while uploading.
So, That's it we have done with image uploading. 🔥
If you want to learn deep about the File Storage System, then here's the link:
https://laravel.com/docs/8.x/filesystem
Hope you like this article. Don't forget to like 💗 it.
Want to connect ? You can find me on twitter.
Twitter: @iamharis010